ShopDreamUp AI ArtDreamUp
Deviation Actions

I was hoping to get this done sooner, but some of the parts took a while to arrive. They're here now, so it's all done.
I also have to say that this the most awkward build I've had to do.
Let's begin:
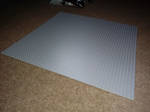


We'll start with the lower section. The baseplate is 48x48, and the first two walls are 1x2x5 panels, with 20 on one side, and 19 on the other. Next is the start of the Technic frame, then filling in the walls. The gap is there for a reason.
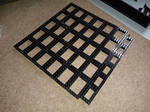


Now the top of the Technic frame, made entirely of 6x8 and 4x6 (and pins, of course), and then come 24 7-beams, 23 of which have pins in each end. The empty one, and two pinned ones are used to attach a 16-long Technic brick, which slots into the gap left on the bottom. A couple of Technic bricks and a 2x2 brick are used to fill in the frame, and the remaining 7-beams are used to attach the top and the bottom together.


Next is the floor. The underfloor is four 16x16 plates, 9 8x8 plates, and some 1-stud wide plates to fill in the gaps. With the floor, I started with the plates for the walls, then the lines for the CPZ and Flame Pit, then filled in the CPZ and the bit between them, and then the area around it the edge to finish it off.

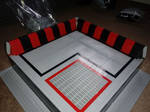

Finally, the walls. First, I did the outer half of the walls, then the slopes for the inner walls, then the beams for the lexan panels on top, and then adding the panels, ending with:

The only thing left to do is attach it to the frame:
 by IHave2MuchFreeTime")
I considered putting this off, as the next part (the flipper) is a virtually identical build, so I considered doing the two parts in one write-up, but after putting this one together, I decided to do them separately, as I'll be putting it together differently because I don't want to repeat this experience.
Current Progress (According to my BrickLink Wanted Lists)
Frame: 100%
Flame Pit: 100%
Flipper: 9%
Pit: 9%
Spikes: 10%
I also have to say that this the most awkward build I've had to do.
Let's begin:
We'll start with the lower section. The baseplate is 48x48, and the first two walls are 1x2x5 panels, with 20 on one side, and 19 on the other. Next is the start of the Technic frame, then filling in the walls. The gap is there for a reason.
Now the top of the Technic frame, made entirely of 6x8 and 4x6 (and pins, of course), and then come 24 7-beams, 23 of which have pins in each end. The empty one, and two pinned ones are used to attach a 16-long Technic brick, which slots into the gap left on the bottom. A couple of Technic bricks and a 2x2 brick are used to fill in the frame, and the remaining 7-beams are used to attach the top and the bottom together.
Next is the floor. The underfloor is four 16x16 plates, 9 8x8 plates, and some 1-stud wide plates to fill in the gaps. With the floor, I started with the plates for the walls, then the lines for the CPZ and Flame Pit, then filled in the CPZ and the bit between them, and then the area around it the edge to finish it off.
Finally, the walls. First, I did the outer half of the walls, then the slopes for the inner walls, then the beams for the lexan panels on top, and then adding the panels, ending with:
The only thing left to do is attach it to the frame:
I considered putting this off, as the next part (the flipper) is a virtually identical build, so I considered doing the two parts in one write-up, but after putting this one together, I decided to do them separately, as I'll be putting it together differently because I don't want to repeat this experience.
Current Progress (According to my BrickLink Wanted Lists)
Frame: 100%
Flame Pit: 100%
Flipper: 9%
Pit: 9%
Spikes: 10%

LEGO Ideas - BattleBots
I've got another Ideas project up, this time it's BattleBots. If you've ever wanted your own LEGO BattleBox or BattleBots, then here you are. It would be nice if you could support it, and share it around if you could. Thanks.
BattleBots - BattleBox and Robots
And my other two projects are still going. If you haven't supported them, then give them a look:
Thunderbird 4
POD Builder Set
LEGO Ideas
These are back. It's been a while. They were both uploaded last year, but they had about 80 supporters with about 10 days left. so I forgot about them. Well, turns out they got 100 supporters and got extended. and now they've both got less than 200 days left, so I'm going to plug them again. It would be nice if you could support them, and share them around if you could. Thanks.
Thunderbird 4
POD Builder Set
Pullback Robots
For a while, I've been working on these little things.
They're all built on pullback motors, and at the next show will be battling it out in my arena.
They also don't have names yet, so I'm taking suggestions.
Shildon Brick Show - November 10th-11th
Brick Alley LUG's Shildon Brick Show is back this year, and like last year I'll be displaying.
Event website
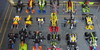
And some pictures of my dsiplay from last year:
Featured in Groups
© 2017 - 2024 IHave2MuchFreeTime
Comments6
Join the community to add your comment. Already a deviant? Log In
That honestly looks awesome, can't wait for the final build!