ShopDreamUp AI ArtDreamUp
Deviation Actions

So, I'm finally getting round to do this. I've been planning this for a while, and all my orders have arrived, so let's start with the
frame for the arena.
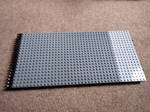
We'll begin with the centre section:


Everything in this model has a Technic superstructure, to make it more stable, and to make it easier to go together. It allows it to be built in parts, so it's easier to move around, and it doesn't balloon outwards quickly, so I have more room to work with.
Next, the arms of the frame:


A 40-stud long backbone, extended to 41-studs long with the two Technic bricks at the front. These have Technic corners attached to hold the Technic beams on, and then the plates for the floor are attached, along with hooks for the entry gates.
Next, do this again three more times:

The next step is the floor and gates:
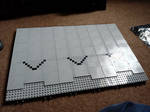

Three of them are the same, so we'll start with them. The starting arrows start 24-studs from the entry gate. The parts that remain uncovered will be filled in at the very end. Next is the entry gate, which are 5-studs tall, not including the bars to attach it to the frame. Once attached, they'll stay up with friction alone, but I added some support just to be sure.
These are now ready to be attached to the centre section:

Now for the final arm:


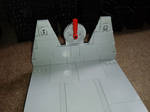


This one is different to accommodate the pit tyre, and the Doom Dail. The first six studs along are different, with two 1x3 plates for attaching the pit tyre to. The Doom Dial is built in a similar way to the entry gates, and attaches the same way. Finally, the pit tyre is a 1x16 brick and some slope pieces, with an axle brick to hold the tyre. Now it's ready to be attached to the rest of the frame:

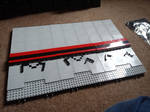
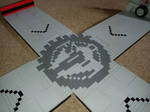
Now it's time to finish it off. All that's left to add is the mosaic, and to fill in the floor around it. I started with the dark grey, but it doesn't really matter in which order they're done:


And that's the frame done.
These updates will be sporadic, as it takes time to save up the money to order parts, and then for the orders to arrive. Plus, I have to put them together, which takes time, and so does my job, which may mean I might not be able to assemble things straight away. The only timeframe I'm working to really is to get the whole thing finished by November, and hopefully, I'm on track for that.
Current Progress (According to my BrickLink Wanted Lists)
Frame: 100%
Flame Pit: 12%
Flipper: 5%
Pit: 8%
Spikes: 8%
Next part should be the Flame Pit section.
frame for the arena.
We'll begin with the centre section:
Everything in this model has a Technic superstructure, to make it more stable, and to make it easier to go together. It allows it to be built in parts, so it's easier to move around, and it doesn't balloon outwards quickly, so I have more room to work with.
Next, the arms of the frame:
A 40-stud long backbone, extended to 41-studs long with the two Technic bricks at the front. These have Technic corners attached to hold the Technic beams on, and then the plates for the floor are attached, along with hooks for the entry gates.
Next, do this again three more times:
The next step is the floor and gates:
Three of them are the same, so we'll start with them. The starting arrows start 24-studs from the entry gate. The parts that remain uncovered will be filled in at the very end. Next is the entry gate, which are 5-studs tall, not including the bars to attach it to the frame. Once attached, they'll stay up with friction alone, but I added some support just to be sure.
These are now ready to be attached to the centre section:
Now for the final arm:
This one is different to accommodate the pit tyre, and the Doom Dail. The first six studs along are different, with two 1x3 plates for attaching the pit tyre to. The Doom Dial is built in a similar way to the entry gates, and attaches the same way. Finally, the pit tyre is a 1x16 brick and some slope pieces, with an axle brick to hold the tyre. Now it's ready to be attached to the rest of the frame:
Now it's time to finish it off. All that's left to add is the mosaic, and to fill in the floor around it. I started with the dark grey, but it doesn't really matter in which order they're done:
And that's the frame done.
These updates will be sporadic, as it takes time to save up the money to order parts, and then for the orders to arrive. Plus, I have to put them together, which takes time, and so does my job, which may mean I might not be able to assemble things straight away. The only timeframe I'm working to really is to get the whole thing finished by November, and hopefully, I'm on track for that.
Current Progress (According to my BrickLink Wanted Lists)
Frame: 100%
Flame Pit: 12%
Flipper: 5%
Pit: 8%
Spikes: 8%
Next part should be the Flame Pit section.
LEGO Ideas - BattleBots
I've got another Ideas project up, this time it's BattleBots. If you've ever wanted your own LEGO BattleBox or BattleBots, then here you are. It would be nice if you could support it, and share it around if you could. Thanks.
BattleBots - BattleBox and Robots
And my other two projects are still going. If you haven't supported them, then give them a look:
Thunderbird 4
POD Builder Set
LEGO Ideas
These are back. It's been a while. They were both uploaded last year, but they had about 80 supporters with about 10 days left. so I forgot about them. Well, turns out they got 100 supporters and got extended. and now they've both got less than 200 days left, so I'm going to plug them again. It would be nice if you could support them, and share them around if you could. Thanks.
Thunderbird 4
POD Builder Set
Pullback Robots
For a while, I've been working on these little things.
They're all built on pullback motors, and at the next show will be battling it out in my arena.
They also don't have names yet, so I'm taking suggestions.
Shildon Brick Show - November 10th-11th
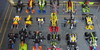
Brick Alley LUG's Shildon Brick Show is back this year, and like last year I'll be displaying.
Event website
And some pictures of my dsiplay from last year:
Featured in Groups
© 2017 - 2024 IHave2MuchFreeTime
Comments1
Join the community to add your comment. Already a deviant? Log In
NIIICE.
 Best of luck with the rest of the arena!

Best of luck with the rest of the arena!